How to Convert to Slow Motion in Apple Motion
Apple Motion will allow you to create professional videos and animations whether for a film or a promotional video. You can also use Apple Motion to edit clips quickly and easily to add to some larger film productions.

How to Convert to Slow Motion in Apple Motion
Besides animation, you can also perform other things with Motion to enhance the project’s quality. Adding effects or converting a video to slow motion is entirely possible with Apple Motion.
-
Step 1: Film Footage
Before converting anything to slow motion, you need to film your footage first. You may use any device or camera to shoot the video. But make sure to shoot it in 30 frames per second, however, a 60-frame per second video would create a smoother slow-motion video.
-
Step 2: Add Footage to Motion and Trim
After shooting your video, you can start the process of converting your video to slow motion by adding or importing it to Motion. Then, trim the video to a particular length that captures the highlight of the scene of the subject. To trim, point your mouse to the edges of the video layer in the work area; the pointer will change the icon to a trimming tool and you can drag it to the opposite side of where you are trimming.
-
Step 3: Set Speed

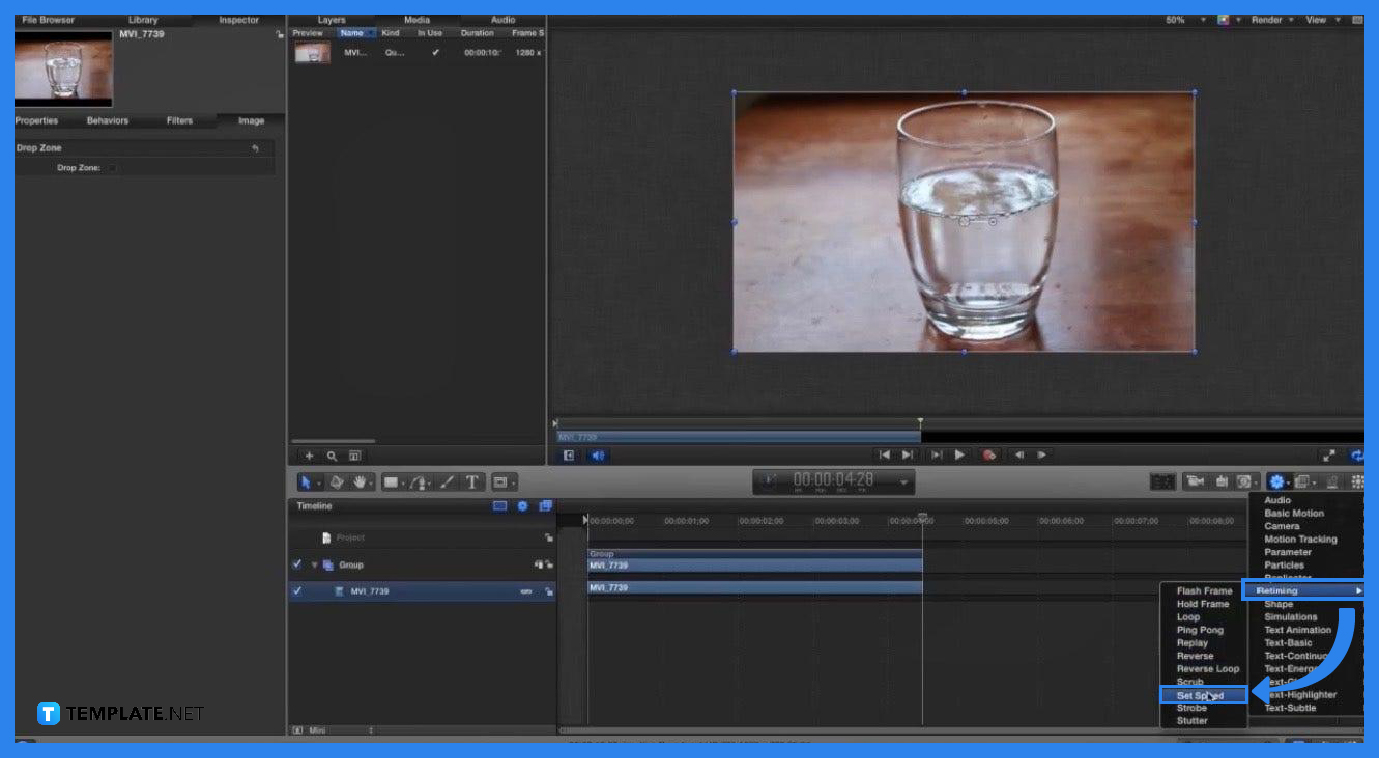
After trimming your video, lower the speed setting. You can do this by selecting the footage and clicking the gear icon at the right corner above the work area; from its menu, point to “Retiming” then select “Set Speed.” Next, click “Properties” and “Inspector:” below is the “Timing” setting where you can adjust the speed to 50% or lower (depending on how slow you want your video to be) and set the “Frame Blending” to “Optical Flow” which will create new frames and make your video smoother. -
Step 4: Create RAM Preview
Once you are done setting the speed and other adjustments, you may now proceed to create a RAM preview. Doing this will enable you to view how the final product would like with all the settings you applied. To do this, go to “Mark” in the upper lefthand ribbon, point to RAM preview, then select “All;” this will take some time depending on how long your video is.
FAQs
What is the best frame blending option?
The “Optical Flow” would be best to make your slow motion video look smoother, but you can just choose “None” if you prefer an ordinary slow motion clip.
Why does my video look chopped?
Your video may appear chopped because of either of these reasons: one is because the frames in which your footage was shot don’t match the setting of your current Motion project or two, the frame blending isn’t appropriate for your video.
How to make the slow-motion video much slower?
To make your video much slower, you can just decrease the percentage of the Speed until you are satisfied with how the video looks like.
Which is better for making slow-motion videos, Premiere Pro or Motion?
This is subjective and could be determined by the preference of the user but for simpler video productions, Motion can be utilized and for bigger productions, Premiere Pro.
Is it necessary to create a RAM preview in Motion?
You can export or save the file after setting everything but, to maintain quality outputs, you can create a RAM preview to check what aspect of the video needs editing or adjusting.

